Glue down vinyl plank flooring is forgiving. It handles heavy foot traffic like a champ, doesn’t get affected by moisture much, and is extremely simple to upkeep between your busy schedule. The best part? You can handle the installation all on your own.
But, before you get too carried away, there are proper protocols to follow to make sure your glue down vinyl flooring is installed the right way. Your floors can look absolutely stunning and last for decades, provided you’ve installed them correctly. The devil’s in the details, people.
One small slip-up and you’re looking at an expensive headache. Here are 15 common mistakes we see homeowners and contractors make regularly, and how you can get them right the first time!
1. Rushing the Prep Step
Your glue down hardwood floor is strongly fixed to your subfloor with the help of an adhesive. This means that your subfloor is the foundation, and if it’s off, soon everything else will be too. Yet, we constantly see so many people treating subfloor preparation like a quick cleaning job when it’s anything but!
Here’s what a proper subfloor preparation looks like:
- The subfloor needs to be level within ⅛ of an inch over 6 feet. You can check for dips and high spots by using a long level or even a straightedge. Any ups and downs need to be handled with sanding or leveling compound, respectively.
- Make sure you’ve checked moisture levels using a moisture meter. Any reading above 4.5% moisture content will cause problems with your vinyl glue down flooring. If moisture levels are high, you can always increase the drying time.
- Last, but not least, cleanliness will make everything so much smoother (pun intended). Every speck of dust and debris can create bumps and prevent adequate bonding. We recommend vacuuming, followed by a tack cloth.
2. Skipping Acclimation
This might come as a surprise to most, but your glue down vinyl plank flooring needs to sit in the installation room for at least 48 to 72 hours before you start the initial installation process.
A good way to do this is by removing the planks from their packaging and stacking them with spaces between each layer. This helps air circulate around them.
3. Using the Wrong Adhesive
Using the wrong adhesive can void your warranty and basically ruin the installation before it even begins properly. Every manufacturer specifies exactly which adhesive works for their product.
Always read the fine print on both your flooring and adhesive. You’ll thank us later.
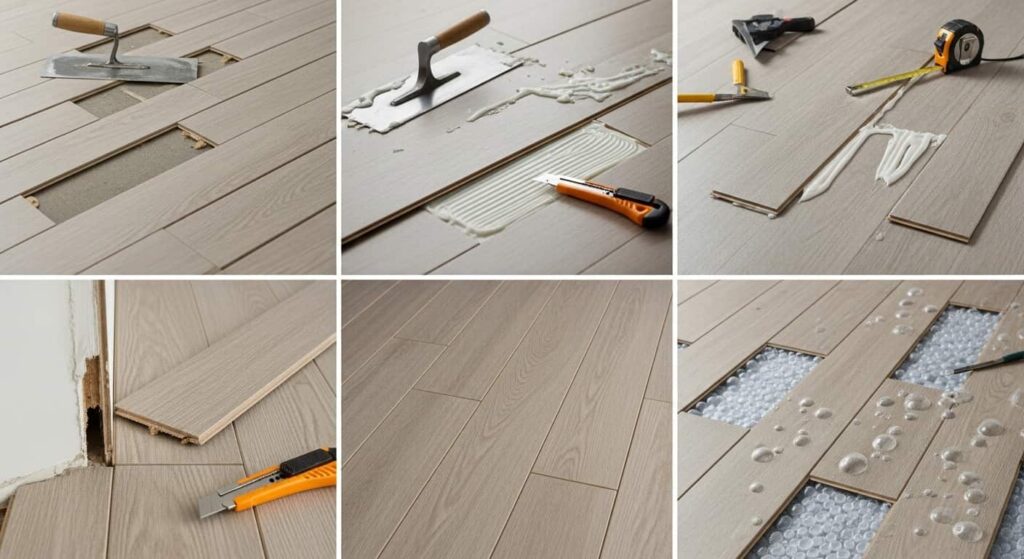
4. Poor Adhesive Application
Spreading adhesive isn’t like buttering your toast on a Monday morning. It requires the perfect balance. Too little and your planks won’t bond.
Use the right trowel size and apply adhesive in manageable sections. Your goal is to have uniform coverage without excessive buildup.
5. Not Paying Heed to Expansion Gaps
Glue down wood flooring needs room to breathe. Fluctuations in temperature, humidity, and other natural properties of vinyl all require expansion space. Always leave a ¼ inch gap around the entire perimeter of the room with the help of spacers for uniform gaps.
6. Poor Plank Layout and Pattern Planning
There’s nothing worse than starting an installation without knowing what your layout or pattern’s going to look like. Always measure your room beforehand and plan your layout on paper. We also recommend avoiding patterns and instead staggering your planks randomly. This helps create a more natural look.
7. Poor Cutting Techniques
Vinyl planks don’t cut the same as wood, despite looking a lot like it. Using the wrong cutting technique can create unsightly, ragged edges that don’t fit together and leave gaps for dirt. Always score the face of the plank with a sharp utility knife for straight cuts, and simply snap the plank along the score line. For curved or intricate cuts, you can use a fine-tooth saw.
8. Not Confirming Levelness During Installation
So, you checked the levelness of your subfloor before installing the glue down vinyl plank flooring. Great! But did you check again during the installation?
Just because it was level when you started, doesn’t mean your installation stays level. Adhesive ridges, dirt, debris, and careless mistakes can all lead to high or low spots as you install your planks. Always use a level frequently during the installation to check your progress. If you happen to notice areas that are high or low, stop and fix the problem quickly before moving ahead.
9. Not Factoring in Moldings and Transitions
Your vinyl glue down flooring is practically incomplete without factoring in moldings around the perimeter and transitions between rooms. Again, make sure you plan all this out beforehand in the layout before you install even a single plank.
If you’re able to, removing baseboards before installation also allows the glue down laminate flooring to tuck under the molding for a seamless look.
10. Poor Rolling or Pressing
If there’s one thing your glue down hardwood floor needs, it’s firm and consistent pressure to bond properly with the adhesive. You’ll ideally need a 100-pound roller to roll each plank in both directions. You typically have a 10 to 15-minute window when you can do this.
If you don’t have such a heavy roller at hand, you can always use a hand roller or even walk on the planks with clean shoes. At the end of the day, it’s all about applying consistent pressure.
11. Installing Planks in Extreme Weather Conditions
Installing glue down wood flooring in a garage in the peak of winter or summer is simply asking for trouble. Extreme temperatures affect both your planks and adhesive. Most planks have a specific temperature range for when you can install them (usually around 65 to 85°F). Any temperature outside the range and the adhesive may not cure properly.
12. Ignoring the Manufacturer’s Instructions
As much as we all hate it, reading the manual can save you from a lot of hassle. Every vinyl glue down flooring comes with specific instructions, and these aren’t mere suggestions. You need to follow them if you want your warranty to still be applicable.
Give the instructions a thorough read before starting the night before. Always keep the manual handy during installation and refer to it as you go.
13. Not Cleaning During Installation
Adhesive squeeze out, dirt, and debris can all creep up on you fast if you’re not careful. Always make sure to clean any extra adhesive with the solvent and never let it cure on the surface of the planks or between the joints.
14. Rushing the Curing Process
By now, you’re probably exhausted. But, you know what they say: slow and steady wins the race. Your floor isn’t ready for normal traffic the moment you install the last plank. Glue down laminate flooring needs time for the adhesive to reach full strength. This is usually 24 to 48 hours. Don’t rush the process; you could potentially undo all the hard work you just put in!
15. Skipping the Final Touch-ups
If there’s one thing DIY installations can’t match, it’s got to be the final, professional look. But that doesn’t mean you can’t do your due diligence.
Take some time out to walk through the entire installation looking for loose edges, gaps, adhesive residue, or other imperfections. Address these issues while you still have materials and tools available.
Also Read: Can Brown Laminate Flooring Be Stained Black
Getting it Right the First Time
Installing glue down vinyl plank flooring requires patience, attention to detail, and respect for the process. Each step builds on the previous one, and shortcuts almost always lead to problems.
If this list seems overwhelming, remember that thousands of homeowners successfully install their own floors every year. The key is taking your time, following instructions, and not being afraid to stop and fix problems when they arise.
At Floorika Fine Hardwood, we understand that flooring installation can feel overwhelming, especially when so many things can go wrong. That’s why we offer both glue down vinyl plank flooring products and installation services that eliminate these common mistakes entirely.